SIMs Provisioning
This section describes how to download and view sample provisioning files.
Guidelines
This function is available only for Mobile Network Operators (MNO) that are managing and provisioning SIMs by themselves.
A custom output file is used to provision the SIMs. You can download and view a sample of the output file structure in two formats:
- *.outp that you can import directly into and read from a text editor such as Notepad++
- *.xslx, an Excel file that translates the Output Variables of the *.outp file into Excel file format for easy viewing
The MNO operator can provision SIMs only to its own root account and to no other. Only after the SIM is provisioned can the MNO operator allocate that SIM to one of its child accounts. The provisioned SIMs also appear in the MNO's parent account as already allocated to the MNO.
NOTE: floLIVE does not validate the SIM IDs, such as IMSIs, once provisioning is complete.
Download Sample Output Files
To download sample output files, do these steps:
- From the Navigation Bar, click SIMs Provisioning.
- Click Sample to display the Sample options.
- Select the Provisioning file format you want to download (*.xlsx or *.outp)
- Click Apply the provisioning sample to your compute.
View Sample Output Files
To view sample output files:
- View the *.xlsx file in Excel.
- View the *.outp file by importing it into a text editor, such as Notepad++.
The file looks like this:
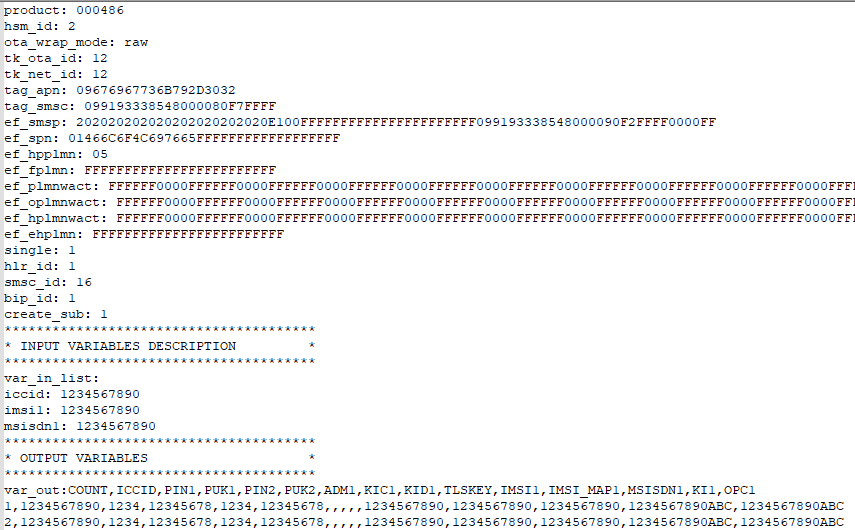
The SIM is provisioned using the Output Variables at the bottom of the output file where the SIM parameters appear in csv format.
Note: The system recognizes only the IMSI_Map values, not the IMSI values. For example, there is an IMSI1 value and an IMSI_Map1 value. The system takes only the IMSI_Map1 value and that is the value that appears under IMSI1 column in the Excel (*.xslx) file.
Provisioning SIMs
To provision SIMs, do these steps:
- Build your output file using the sample files as a guide.
- From the SIMs Provisioning, click Upload. The Upload dialog box is displayed.
- Browse or drag the output file into the Drag and drop files here field.
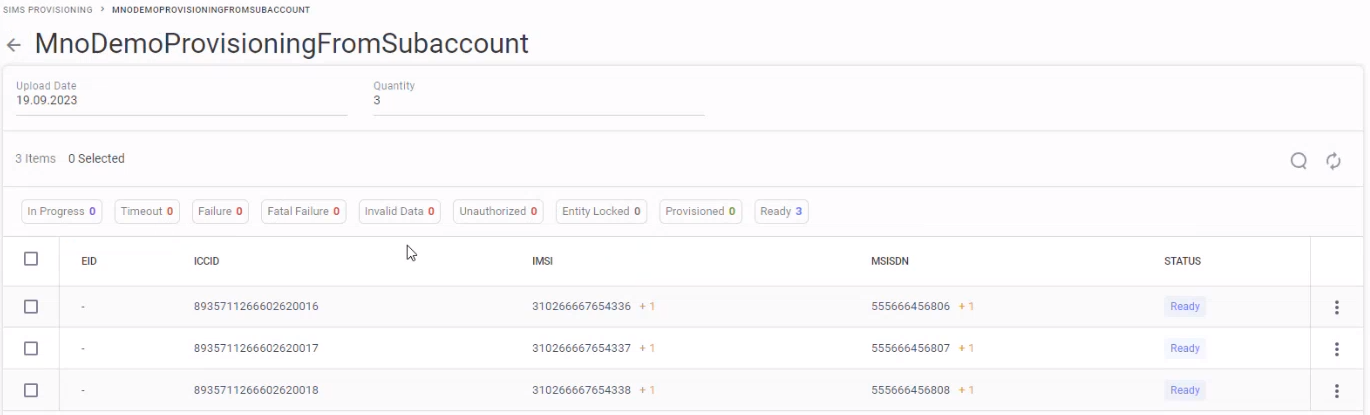
- Click Upload. When the output file is uploaded, the file appears in the SIMs Provisioning table with a Ready status, indicating that the SIM(s) in the output file can now be provisioned.
NOTE: View the Free Resources column in the SIMs Provisioning table. The value indicates how many SIMs in the output file remain available for provisioning.
- Click on a table row with a Ready status. The Resources table for that file appears; the table lists all resources (ICCID/EID) uploaded with the output file with status Ready (ready to be provisioned).
- Select one or more SIM resources using the check boxes on the left of the rows, for example.
Upload Output File
- Select one or more SIM resources using the check boxes on the left of the rows. The Resources table for that file appears; the table lists all resources (ICCID/EID) uploaded with the output file with status Ready (ready to be provisioned).
- Click BBS Provision to display the Provisioning Confirmation message.
- Click Yes. The Provisioning process begins and the SIM Resource or Resources you selected appear in the SIM Resources table with status In Progress.
When Provisioning is complete, the SIM appears in the SIMs Table. Use the Search SIMs table to find the SIM. You can now perform all SIM Actions, such as Attaching Plans.
NOTE: floLIVE does not validate the SIM IDs, such as IMSIs, once provisioning is complete.
Additional Information
- The SIMs Resource(s) that has been provisioned appears in the Resources table with status Provisioned.
- Return to the SIMs Provisioning table showing the output file name.
- If there are Free Resources available, the Output File name appears with the status Ready.
- If all resources in the Output File have been provisioned, the file name appears with status Provisioned.
- If there is a failure, the status is Failure. In case of failure, contact Customer Support.